Sawing the neck in half.
Why?
Well wood warps in the direction of the grain, so if you cut the neck up the middle, glue it back together on the opposite side (shown in the pics down further) then the grain will have an exact counter-pull if it decides to try and warp. This cancels out any warp that can happen where the neck will twist, i.e. making the thicker strings 'shy away' from the fretboard and the thinner get closer, or vice versa.
Have a look:


 - my hand is getting a lot steadier on the auld band saw. It's amazing how fast you can get used to the tools involved over the course of making one instrument.
 - then into the vice. Make sure that each piece doesn't 'float' on the glue. Keep them level and even all around as you close the vice slowly.
 - once you're happy with it, stick a million clamps all around and go make a cuppa!
I spent a lot of time today getting measurements for spacing the guitar tuners on the headstock. I need to use the full width of the headstock blank for my design.
My design is a Hammerhead Shark.
My first attempt isn't great but I've some sketches since and it's all looking very good.
Here's my first attempt at putting a sketch onto paper with measurements:


A brief attempt at planing the sides was made next. Madagascar rosewood is gorgeous. I will NEVER use it again though! It's far too hard, and oily, it's prone to chipout and if cracks occur, they seem to travel up the grain very easily.
I abandoned them again to brainstorm.
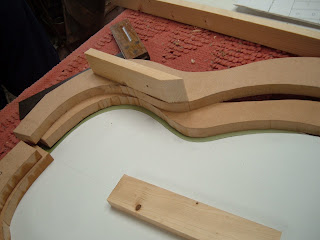
I moved back to the mould I was creating and set about giving it the height it needs. I also did one last run of the edges to make sure they were accurate. I got a long piece of pine that was 2" wide and cut segments out of it of different lengths. I glued these around the edges as I went. Check it out:


 - in this pic you can see they're all sitting in a bed of glue.


No comments:
Post a Comment